Take cover off the Idesk and remove all support blocks and cardboard/foam protection. Inspect for damage. Remove 80/20 frame strapped to inside of Idesk and locate the bolts for attaching the projector. Locate and remove a key for opening the screen.
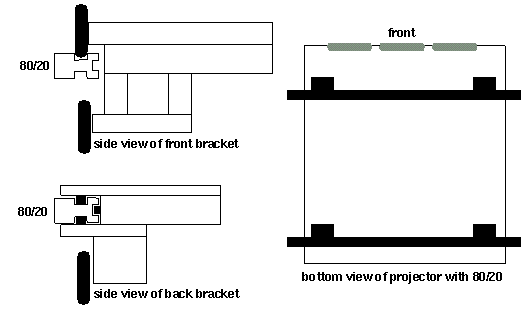
Remove projector from the casing. Turn upside down and remove screwin pegs. Attach 80/20 frame to underside of the projector. Then slide onto 80/20 rail inside Idesk. The top wheel on the front bracket sits on the top groove of the 80/20 rail. The back bracket slips onto the rail inside the Idesk.
Connecting Cables
Projector Alignment
Four of the programs in CAVE/bin/ (mplock, mpunlock,
restarttrackd, and killtrackd)must be installed with setuid root
permission. They are distributed as mplock.exe, etc, and should be
copied and chmod'ed as necessary.
If the CAVE/ hierarchy is NFS mounted, this may require
having a copy of these executables on a local disk (depending on
your NFS security). Our standard solution for this is as follows:
In the CAVE/etc/ directory are three configuration files -
cave.config, idesk.config, and zbox.config.
cave.config is a generic configuration file which sets
most of the standard options, and tells programs to run in
CAVE simulator mode. idesk.config is a standard
ImmersaDesk configuration. zbox.config is a sample
configuration for a system driving a full CAVE. On an
ImmersaDesk system, copy the file idesk.config to
HOSTNAME.config, where HOSTNAME
is the system name, as returned by /usr/bsd/hostname.
When a CAVE program starts, it will first read the generic
cave.config, and then will read HOSTNAME.config
for any machine-specific settings. This allows multiple computers
running in different modes (simulator, ImmersaDesk, CAVE, etc)
to share one NFS mounted CAVE/etc/ directory. (NB: there
is one obvious flaw in the present design - you should not
name your machine 'cave'.)
NB: Both configuration files (cave.config and
HOSTNAME.config) need to be installed, as the
default cave.config contains some standard settings
which are not it the host-specific file.
On an Onyx/RE2, issue the command:
Once you have set the default video mode, with either setmon
or ircombine, you must restart the graphics to load it.
Do this either via the Vulcan Death Grip (Shift-Control-F12-/),
or by running /usr/gfx/stopgfx ; /usr/gfx/startgfx .
Warning: On an IR system, you will probably need patch 1355
to get a 1024x768_96s video format which works correctly with the
Electrohome projectors.
To reset the display to the normal 1280x1024 60 Hz format, run
First, edit your ImmersaDesk configuration file (the one in
CAVE/etc/ originally named idesk.config), and make sure
that the tracker serial port and baud rate are correct.
A standard configuration is as follows:
Make sure that both of the serial ports (ttyd1 and ttyd2 above)
are configured as "Available" in the System Manager; i.e. the
system does not think that anything is attached to them.
Often port 1 is configured to have a terminal attached to it;
this will confuse the tracking, and should be disabled
(or else use a different port).
my note:
use ttyd2 and ttyd3 leaving ttyd1 as terminal. ttyd2&3 can
be made available by: chmod +rw /dev/ttyd2 & chmod +rw /dev/ttyd3.
But generally their default is availabe.
To have the daemon automatically started whenever the system
boots, add the script to /etc/rc2.d. i.e.:
Remember to make sure that the mdesk program is always
running on the tracker PC.
If cavevars (or another CAVE program) does not run correctly,
the first thing to check is the configuration data. The final
configuration which a program will use is printed to stderr when the
program starts; review this and make sure that all relevant entries
appear correct. For reference, the normal configuration output from
our ImmersaDesk is as follows:
CAVE Library
Unpack the software. The complete CAVE software distribution should
come in a gzip compressed archive file CAVE.tar.gz.
To unpack it, execute the following command:
gunzip < CAVE.tar.gz | tar xvf -
This will create a directory named CAVE, with the subdirectories
bin, doc, etc, include, lib, and
src.
The basic contents of the directories are:
This directory hierarchy should normally be installed as /usr/local/CAVE.
If it is installed elsewhere, the environment variable CAVE_HOME must be
used to tell CAVE programs where to search for configuration and support
files (e.g. setenv CAVE_HOME /disk/CAVE).
	cp mplock.exe /sbin/mplock
	chown root.sys /sbin/mplock
	chmod u+s /sbin/mplock
	ln -s /sbin/mplock /usr/local/CAVE/bin/mplock
    (repeat for mpunlock, restarttrackd, killtrackd)
(The programs need to be locatable through the CAVE/bin/
directory, as that is where CAVE programs will run them from.)
The source code for four three programs is in CAVE/src/.
Video Display
CAVE programs are normally run in a stereo display mode, preferably
the newer quadbuffered stereo. Only certain SGI video formats
support stereo display; the normal 60 Hz or 72 Hz formats do not.
Currently, the standard stereo video mode used is a 96 Hz format.
While the CAVE software can be made to switch into this mode when
it runs (and back out when it exits), it is preferable to leave
the system in 96 Hz mode permanently.
The video mode is changed using the setmon command; changing
the default mode requires root privileges.
/usr/gfx/setmon -x 1025x768_96s
On an Indigo2 Impact, issue the command:
/usr/gfx/setmon -x 1024x768_96s
On an Onyx Infinite Reality, the command:
/usr/gfx/setmon -x 1024x768_96s
may work, although it tends to fail on many currently shipped systems.
The method that is known to work is to run /usr/gfx/ircombine.
This program is a GUI which allows you to define your own combinations
of video formats. After starting the program, hit the "Edit Globals..."
button (in the lower right corner); this brings up a dialog box.
Change the managed area on the top line of the dialog to be
1024 by 768, and hit "Close". Then hit the "Ch0" button (at the top
of the window), and choose 1024x768_96s.vfo in the file selector.
Now select "Save to EEPROM" from the "File" menu, and hit "Download"
in the dialog that pops up. (You can also save the combination to a
.cmb file for later loading with setmon).
/usr/gfx/setmon -x 60hz
and restart the graphics.
Tracker Daemon
In older CAVE and ImmersaDesk setups, CAVE programs communicated
directly with the tracking and wand systems. The newer, preferred
approach is to use trackd, the tracking daemon. The daemon
is left running on the system at all times, and writes data into
shared memory for CAVE programs to read; it has much lower overhead
than the older drivers, and avoids some problems inherent in the
old dial/button box approach used for the wand.
	TrackerPort /dev/ttyd2
	TrackerBaud 38400
	TrackerType daemon
	Wand daemon
	SerialTracking y
Next check that the script CAVE/bin/starttrackd has the
correct serial port for the wand and the correct tracker type.
The standard trackd command line is:
/usr/local/CAVE/bin/trackd -spacepad -controller /dev/ttyd1
The argument following "-controller" is the name of the serial port
to which the wand is attached.
(For purely historical reasons, the wand (aka controller) serial port
is given on the command line while the tracker serial port is given
in the configuration file.)
ln -s /usr/local/CAVE/bin /etc/rc2.d/S992trackd
If the tracking daemon seems to die at any point, it can
be restarted using CAVE/bin/restarttrackd. This
program merely does an /etc/killall trackd and then
re-runs /usr/local/CAVE/bin/starttrackd (both as root).
Tracker Configuration (auto_config)
Auto_config program allows you to set up some of
the transmitter options automaticly. Make sure that when
you run it you have following entries in your CAVE config file:
TransmitterRotationMatrix 1.0 0.0 0.0 0.0 1.0 0.0 0.0 0.0 1.0
TransmitterOffset 0 0 0 feet
HeadSensorRotation 0 1 0 0
HeadSensorOffset 0 0 0  inches
WandSensorRotation 1 0 0 0
WandSensorOffset 0 0 0  inches
auto_config <filename>
<filename> - name of the file where config entries will be
saved.
Generated file should look something like that:
ProjectionCorners desk -33.50  0.00  0.00 -33.50 39.40 -30.78 33.50  0.00  0.00 in
TransmitterRotationMatrix 1.0000 0.0000 0.0000 0.0000 0.7986 -0.6018 0.0000 0.6018 0.7986
TransmitterOffset -0.114872  5.284781  -1.264127 feet
Add those 3 line to your config file. Add also following lines:
HeadSensorRotation 0 1 0 90
HeadSensorOffset 0 -6.5 -2.5 inches
WandSensorRotation 1 0 0 -30
WandSensorOffset 0 2 -7 inches
Now system is configured. You can check it running cavevars, or
calibration <angle>.;
<angle> is screen rotation angle (roughly 52 degrees).
Testing
The basic confidence test is CAVE/bin/cavevars.
This is a simple CAVE program which just displays all the standard
CAVE data - the tracking, wand state, time, and stereo information.
Run it and check that the button presses and joystick movement are
reported, that the tracker positions (both the head and wand) look
accurate, and that the stereo phase is correct.
CAVE Library Version 2.5.6c - Compiled Jul 16 1996
CAVE: Reading configuration file /usr/local/CAVE/etc/cave.config
CAVE: Reading configuration file /usr/local/CAVE/etc/kona.config
****************************************************************
CAVE Configuration:
 Active walls ...................... 1
        screen7(21) [-1x-1+0+0] "DISPLAY=:0.0" both
 CAVE width ........................ 10.00 feet
 CAVE height ....................... 10.00 feet
 CAVE origin ....................... 5.00 0.00 5.00 feet
 Display mode ...................... stereo96 (46)
 Non CAVE Display mode ............. 96hz (49)
 CAVE Scale ........................ 1.000
 In stereo ......................... y
 Hide Cursor ....................... y
 Use tracker ....................... y
 Serial tracking.................... y
 Tracker type ...................... daemon (75)
 Tracker serial ports .............. /dev/ttyd2
 Tracker Baud Rate ................. 38400 (15)
 Tracker Daemon Key ................ 4126
 Use calibration ................... n
 Calibration file .................. /usr/local/CAVE/etc/cave.correction.table
 Transmitter offset ................ -0.080 7.720 -1.660 feet
 Transmitter orientation ........... (1.000,0.000,0.000)  0.000 degrees
 Wand sensor offset ................ 0.000 0.250 -0.583 feet
 Wand sensor orientation ........... (1.000,0.000,0.000)  -0.524 degrees
 Head sensor offset ................ 0.292 0.000 -0.208 feet
 Head sensor orientation ........... (0.000,0.000,1.000)  -1.571 degrees
 Interocular distance .............. 0.229 feet
 Wand .............................. daemon (59)
 Controller Daemon Key ............. 4127
 Simulator ......................... n
 Simulator view .................... 10.000x7.500, 2.000 feet
 Network ........................... n
 CPU locking ....................... n
 CAVE units ........................ feet (76)
 Audio server ...................... 127.0.0.1
 Distribution ...................... none (93)
 App Distribution .................. none (93)
 Gang swap ......................... n
 Scramnet .......................... n
 Shared memory ..................... unix (100)
****************************************************************
If the configuration is correct, review the rest of the system setup
as described in the preceding sections.